Reaper is an audio editing software that strikes a great balance between price and function.
by Ayesha Barmania
These days, podcast editing software tools vary in both price and function, from the expensive and full-featured Avid ProTools ($600 USD) to GarageBand, a free app on most Apple computers. Many podcasters have worked on Audacity at least once, or maybe honed their chops on the indie-friendly Hindenburg. But I want to make the case for why Reaper strikes the perfect balance for both price and function.
For an indie podcaster, Reaper costs $60 USD. There’s no locked functionality or upgrades necessary — right out of the gate you have the full software — and it is capable of a lot. I have yet to find a function of an expensive digital audio workstation (DAW) that Reaper can’t also do. I have streamed recordings live to the internet using Reaper, set up audio matrices to play sounds out of an array of speakers, and used effects to remove background sounds and make voices sound rich.
The one downside to the program that I have found is the inscrutability of its layout when you first get started. On first download, I was overwhelmed by the sleek interface and didn’t know where to start. And that’s what I hope this article might help you with — starting with understanding what you’re seeing when you first open Reaper.
Note: This tutorial uses screenshots from Reaper version 6.03 64-bit for desktop Mac computers. You may notice differences in layout if you are using a different version of the program or operating system. Reaper has a robust support community and many online tutorials. If you find yourself overwhelmed by the differences in layout, treat this module as an outline on important audio editing skills (recording, clips, volume, mixing and exporting) and try watching some of the latest videos on the Reaper website.
Understanding the layout
Reaper should open in a layout similar to what is pictured below. If your layout looks different, you are able to add and take away tools by going into the View menu.
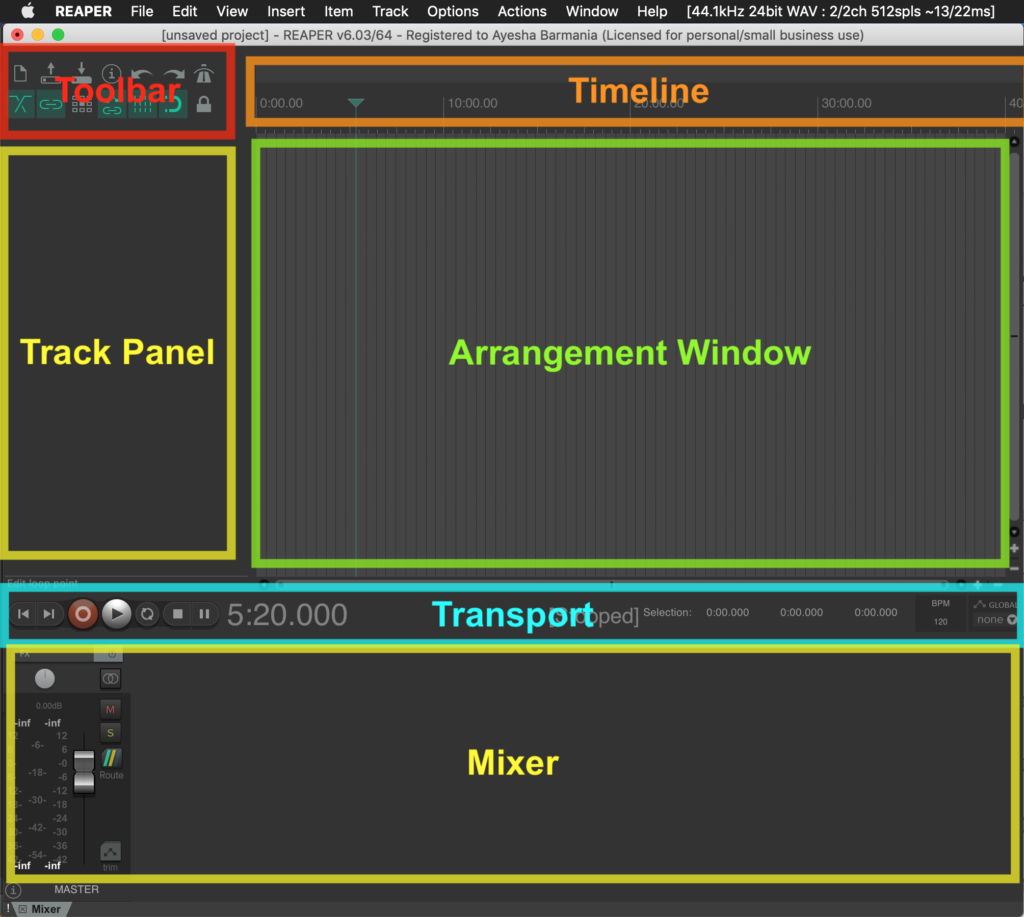
The key components of the layout are the Timeline (aka the Ruler), the Arrangement Window, the Track Panel, the Toolbar, and the Transport. Don’t worry too much about the Mixer right now.
Reaper plays back audio from left to right across the screen; items added to the Arrangement Window will be played in the left-to-right order that they’re arranged in according to the Timeline. You are able to Zoom in and out using the scroll wheel on your mouse — zooming in will show us a shorter period of time, and zooming out will show us more time.
The Transport toolbar allows us to stop/pause, rewind, fast forward, play, return to the beginning, go to the end, and adjust the speed of the Timeline.
The Toolbar shows buttons that will help us toggle settings quickly while we edit. Once you get acquainted, I highly recommend you add and remove buttons and make your own custom Toolbar.
The green line and triangle that cuts across the timeline and arrangement window is called the Cursor or the Playhead. It marks the point where you are in the Timeline.
Don’t worry if it looks intimidating. Once we load some audio into the project, the workflow will become clearer and the project will look more similar to other media editing programs.
Creating a new track
In the Track menu, select Insert New Track. Or, double click in the Track Panel.
This will create a new element in the program called a Track. You can think of a Track as a layer of audio. These layers let you add many different elements to your project that can play at the same time, which creates interesting and complex works. In Reaper, you can add as many layers as you like.
You can name this track by double-clicking on the black bar in the Track Control Panel.

Importing audio
In the Insert menu, select Media file and find your audio file in your file explorer.
Clicking Open will load it in your selected track, and it will appear like this:
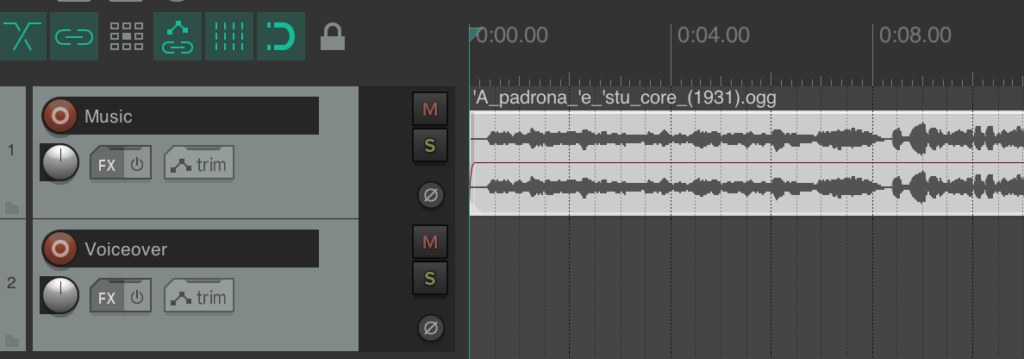
Or, you can drag-and-drop the file from your computer into the track, and it will work just the same.
Material within a track is called an Item. The dark grey shape in the track is a visual representation of the audio waveform. The larger the shape, the louder the audio is at that moment.
Note: If you click away from Reaper, to save your computer’s memory space, the program will consider media files offline. Don’t worry if you see it replace the waveform with the word Offline — your item is still there. Just click back into the program, and it will reappear.
Recording audio
Set audio hardware settings
It’s always good to check your audio hardware settings when you’re getting started recording, editing, or mixing in Reaper. You want to make sure the device you want to record with is set as the Input Device and the device you want to listen with is set as the Output Device.
In the Options menu, select Preferences — this will open the Reaper Preferences window. In my set-up, I am using the built-in microphone on my laptop, and headphones. If you are using a USB microphone or USB headphones or an audio interface, you will need to select the name of your devices in the Input Device and Output Device dropdown menus.
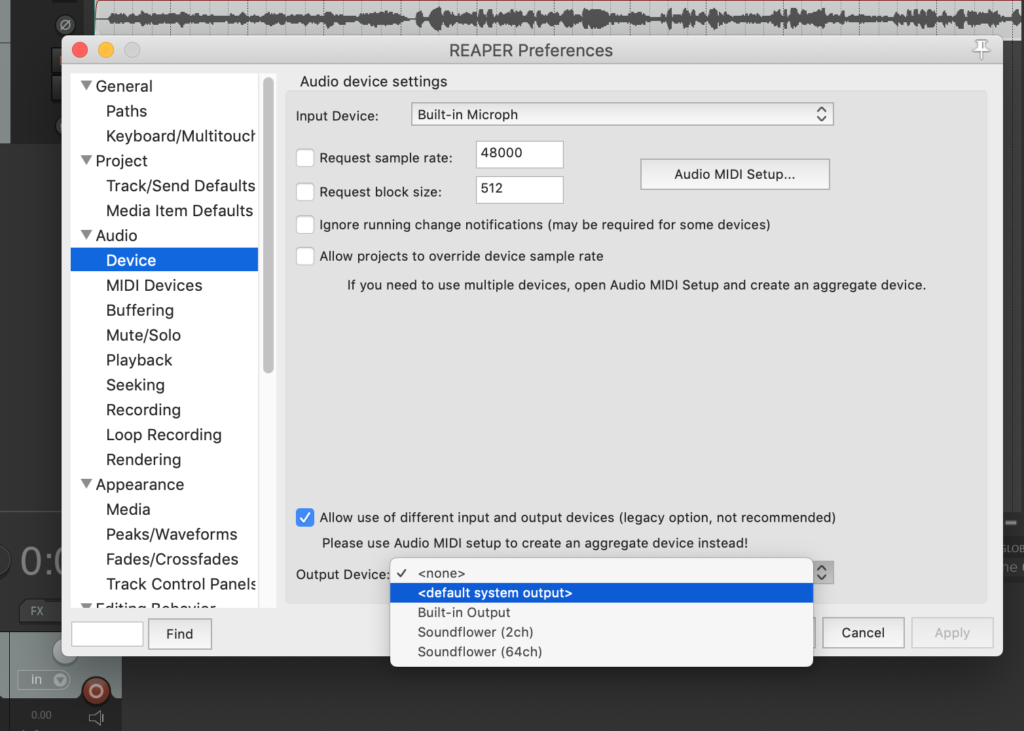
Troubleshooting advice: If you plugged in any new devices after opening Reaper, you may need to close and restart the program for them to become visible in the Reaper Preferences window. Make sure to save your project before you close.
Note: Reaper lets you listen to your recording as it’s happening. If you have a set of speakers set as your Output Device while recording, you will get feedback and a distorted recording.
Arm your track
The first thing to do when you’re ready to record is to Arm the track. To do this, click the red circle next to the track name in the Track Control Panel. If you have other tracks in the project, you may also want to Solo this track, or Mute the others.
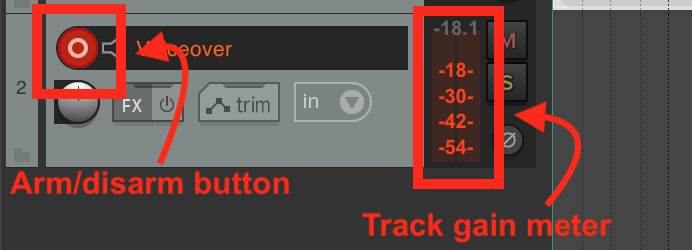
You’ll notice the Gain Meter for the track will activate when the track is armed. You can test whether the proper microphone is set up by using your finger to tap on your microphone. The Gain Meter should show one or two red bars that go all the way to the top of the scale when you tap.
Troubleshooting advice: Not hearing anything? Make sure your microphone and headphones are not set on Mute and that your system audio is turned up to an appropriate level.
Record
Once your track is armed, click the red circle Record button in the Transport toolbar, and Reaper will start recording. A yellow line will show where your recording ends in the timeline.
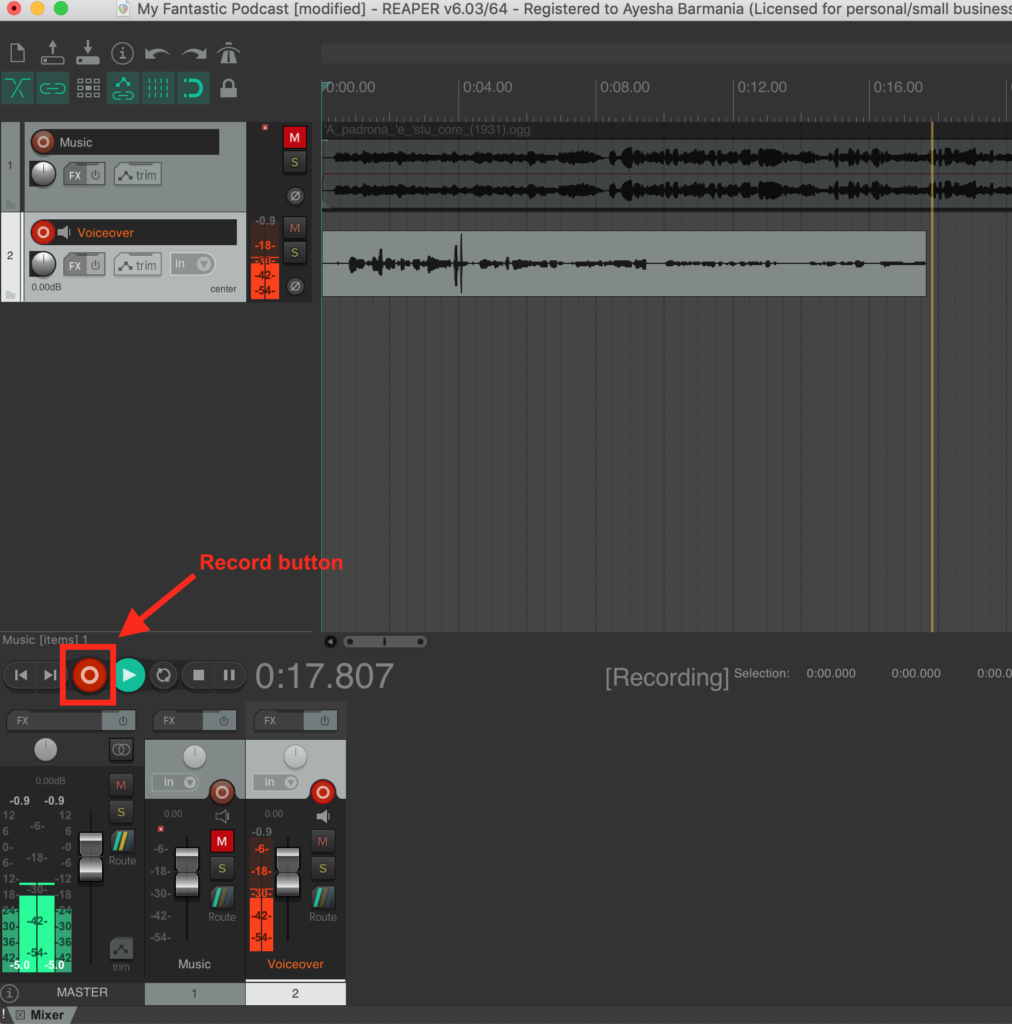
Click the Stop button in the Transport toolbar to end the recording. Reaper will ask you to Save or Delete the file. If you’d like to keep it, select Save, or keep practicing and deleting the file until you’re comfortable.
Creating and manipulating clips
The key skill in editing is making and manipulating Clips. To make clips in Reaper, find a point in your item where you want to make a Split. Use your mouse to place the cursor at the moment and click to set the cursor. You can also do this by playing your project and pausing on the moment you want to begin the edit.
In the Item menu, select Split Item at Cursor. This will divide your item into two new clips on either side of the cursor, and will look like this:
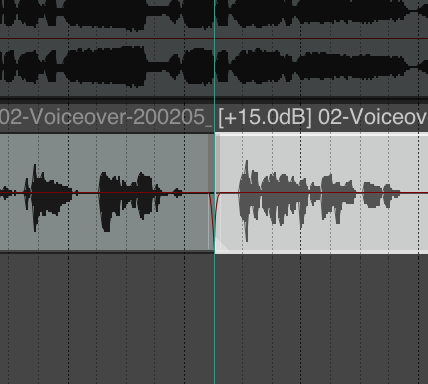
These clips can now be moved independently of each other.
Note: Every time you make a new clip, Reaper considers this a new Item.
To remove the clip, navigate to the Item menu and select Remove Item, or press the Delete key on your computer keyboard. This should leave a gap in the arrangement window where the removed audio used to be.
You can now click and drag the remaining clip forward to fill the space that was left behind.
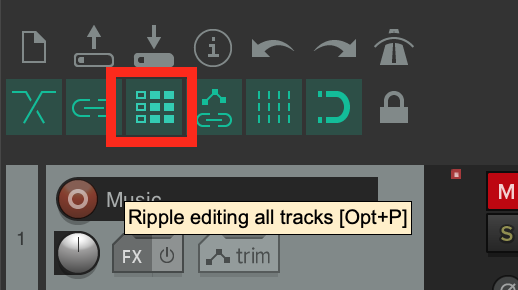
Tip: Turn on Ripple Editing in the Settings Toolbar to have Reaper automatically remove space when items are deleted. You can toggle whether ripple editing is on only for the track you’re working in, or for all tracks in the project.
Adjusting volume
There are several tools available in Reaper to help you mix your audio. We’re going to look at three that deal with volume.
Normalize
To normalize an item, double-click on it, or, right-click and select Item Properties. This will open the Media Item Properties window.
Look for the Volume/pan settings and click Normalize. If your item is already loud enough nothing will happen, but if there is room for your item to increase in volume, the number next to the slider will change from 0.00 dB.
Click Apply or OK at the bottom of the window.
Now when you playback your audio, you may notice it is louder than previously.
Troubleshooting advice: If there is one loud moment in your audio — say you tapped the microphone and it is much louder than the rest of your audio — the normalize function will take that as the loudest point and it will not increase the volume of the rest of the audio. Try editing that loud moment out and normalizing the remaining clips.
Fade in/out
This Media Item Properties window also lets you add and adjust a Fade in and a Fade out. Set the time for the fade in to end, and the fade out to start here, and click OK or Apply.
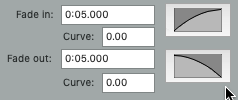
Now, you can also adjust the fades in the Arrangement Window. At the start you’ll notice a red curve at the very beginning of the item — that is a visual representation of the fade in. Hover over the opaque red line with your mouse. Your cursor will change to a new shape, as pictured below.
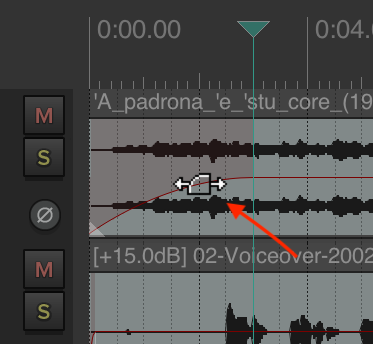
While this new cursor is visible, you can click and drag to adjust when in the timeline your fade in will end.
Go to the end of your clip and adjust the fade out using the same technique.
Tip: Right-click on the fade while the fade cursor is visible, this will open a little menu to edit the shape of the fade.
Automation
Reaper — like many digital audio workstations — allows you to automate changes in certain track parameters through time: in this case we’re going to work with volume.
There are a couple ways to do automation. In this article, we’re going to look at automation using Track Envelopes.
In the Track Control Panel, click on the button that contains the word trim. This will open an Envelopes window. Check the box next to Volume.
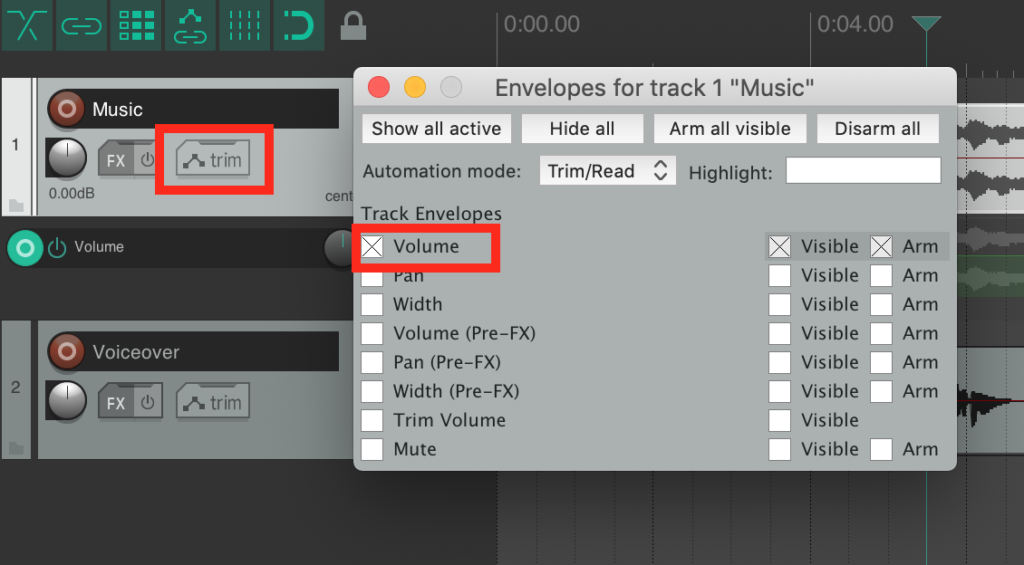
This will open a new Volume track below. Close the Envelopes window.
Set new envelope points by holding the shift key on my keyboard and clicking with the mouse on the green envelope line or by right-clicking at the point and selecting Create new point. The new point will look like a green circle.
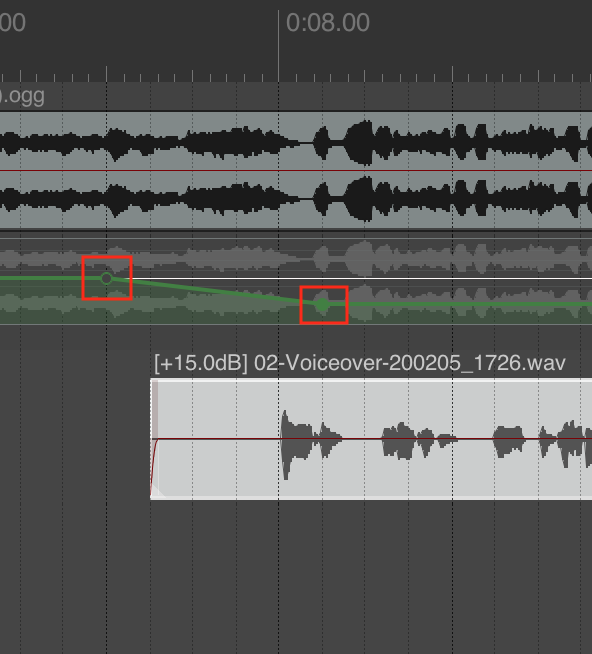
Click and drag the envelope point towards the top of the track to increase the volume, and drag towards the bottom of the track to decrease volume. Reaper will automate the transition from one envelope point to the next.
Finalize your audio and export
And those are the steps to making a very basic podcast in Reaper! Repeat these steps until you have all the elements you need in the order and volume you want. The final step is to render your project so you can post it.
Render
In the File menu, select Render. This will open the Render to File window. Look for the Output format drop-down menu and select the format you want. For a podcast you’re ready to put on the internet, you want to render an MP3.
Then click the Render 1 file… button and Reaper will export your project as an MP3. To listen right away, click Launch File.
Enjoy the fruits of your labour!
Reaper can be daunting to get started in, but once you’ve mastered the basic skills outlined in this module, there’s no limit to what you can make. Have fun experimenting and making podcasts!